How to set up MySQL in Docker with Docker-compose
I was trying to set up a personal project by using a local instance of MySQL; however, a friend of mine told me of a quicker/easier way to get started by using Docker. Here’s how (GitHub repo link here):
Install and Start Docker for Desktop
Docker for Desktop allows you to build and run containers very quickly with minimal setup (although you will need to sign up to the Docker website).
Set up a docker-compose.yaml file in your project’s root directory
Warning- If you’ve never used YAML before, you need to pay attention to the indentation. Inconsistent spacing can lead to faults in your setup!
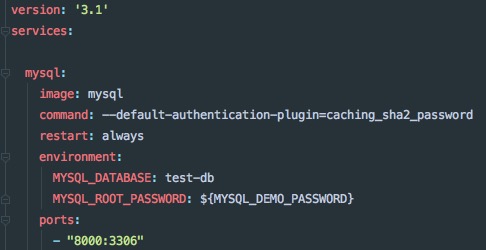
The version tag above relates to the version of docker-compose to use, while the services section denotes the apps we want to implement.
We will name our service ‘mysql’; however, this could be named anything as it’s just a placeholder for your service.
Image - Docker holds many pre-made images with references to each held in Docker Hub. Here, we’re asking to use the MySQL image. As we’ve not declared a specific version of the image, we’ll be given the latest version that Docker Hub holds. Note, that this could cause breaking changes to your application, so be aware of this issue in case your app becomes out of date.
Command - When the MySQL container is created, it will implement the command that we specify in this field.
Note: In MySQL 8.0, caching_sha2_password is the default authentication plugin rather than mysql_native_password. Source
Therefore, for the latest version of the image (at the time of writing this shot), this command isn’t required. However, I’ve left it in so that we can see the type of command that we may want to run when the container is created.
Restart - Just like it looks, it always restarts the container.
Environment - Here, we specify our credentials required to login to MySQL. I’ve specified a database name that will be created on initialization and a password for the root account. In the example above, I’ve set the password to an environment variable; however, for local development, this could be set to a string.
Ports - This is important. When a docker image is created, it is made with its own ports. However, these are independent of the ports held on your computer. Therefore, we need to specify a way for our computer to communicate with the docker image. To do this, we set up the ports variable, which is akin to port-forwarding.
In the example above, 8000 is the port of my host computer, and 3306 is the port of my MySQL Docker image (the default port for a MySQL database connection). So, if I set my application to post to port 8000, my host computer will redirect that traffic to port 3306 of the MySQL docker image. I could have left this to be something like 3306:3306; however, if you had a local instance MySQL running on your host computer using the default port, then there will be a clash and you’ll face some communication issues.
Running the docker image
This is really easy. If you’ve never used docker-compose before you just need to run the following command from within your the directory (i.e., the folder where your docker-compose file lives):
That’s it! You should now have a MySQL instance running on docker with a database set up. You can check this with the following commands:
- Run
docker psin your terminal to get your running container ID
-
Jump onto the container by running
docker exec -it <insert container ID here> /bin/bash. -
Login to the MySQL instance with
mysql -u root -p
…and type in the password you specified in your docker-compose.yaml file.
Now, you should be logged into your MySQL image (as shown above). From here, you can create tables and start inserting data for your application to access.
I hope this helps! If you’ve got any questions or comments, feel free to leave me a note.
If you enjoyed this type of content and would like to see more, feel free to check out my social media accounts:


