What are ASP .NET web forms?
What are ASP .NET Web Forms?
Introduction
Web Forms are pages that are requested by your users through their browser. HTML, client-script, server controls, and server code can all be used to create these pages. When users request a page, the framework compiles and executes it on the server, then it generates the HTML markup that the browser may render. In any browser or client device, an ASP .NET Web Forms page displays information to the user.
Web forms are made up of two parts: the visual piece (the ASPX file) and the code that runs behind the scenes (in a separate class file).
What do ASP .NET Web Forms provide?
ASP .NET web forms provide the following benefits:
- Web Forms is used to overcome the limitations of ASP and a separate view from the application logic.
- An abundant suite of server controls for
common tasks includes data access - Powerful data binding, with excellent tool support.
- Support for client-side scripting that executes in browser.
ASP .NET provides a variety of controls, such as server controls and HTML controls for the Web forms. Some of these controls are:
- Textbox
- Button
- ImageButton
- DropDownList
- ListBox
- Literal
- Table
- Calendar
- Checkbox
- RadioButton
- etc.
Features available in ASP .NET web forms
ASP .NET is packed with capabilities and offers a fantastic framework to create and develop online applications. Among the features are:
- Server Controls: ASP .NET Web server controls are objects that execute when the page is requested and render markup to the browser on ASP .NET Web pages. They also have controls to connect to data sources and display data.
- Master Pages: We may use ASP .NET master pages to generate a uniform layout for our application’s pages. A single master page determines the appearance and feel, as well as the standard behavior for all of your application’s pages (or groups of pages).
- Working with data: There are many available options in ASP .NET to store, access, and display data. We use data-bound controls in an ASP .NET web forms application to automate the presentation or input of data in web page UI components like tables, text boxes, and drop-down lists.
- Membership: Your users’ credentials are kept in the database produced by the application when you use ASP .NET Identity. The program validates your users’ credentials by accessing the database when they log in.
- Client Script and Client Framework: Client-script functionality in ASP .NET Web Form pages can be used to augment the server-based features of ASP .NET.
- Routing: Routing allows us to create URLs that are semantically meaningful to users and can aid in search engine optimization (also known as SEO).
- State Management: Web scraping might be difficult or impossible with state management in ASP .NET pages with authentication.
- Security: You can use ASP .NET Web Forms to add extensibility points and configuration options that allow you to define various security behaviors.
- Performance: A successful Web site or project may rely heavily on performance. You can tweak page and server control processing, state management, data access, application configuration, loading, and efficient coding methods using ASP .NET Web Forms.
- Debugging and Error Handling: ASP .NET Web Forms provides excellent debugging and error handling capabilities to ensure that your applications build and execute smoothly.
- Deployment and Hosting: Visual Studio, ASP .NET, Azure, and IIS all include tools to assist you to deploy and host your web forms application.
Below, we discuss a short task on how to develop a User Registration form. This web form accepts user input before it is sent to the server.
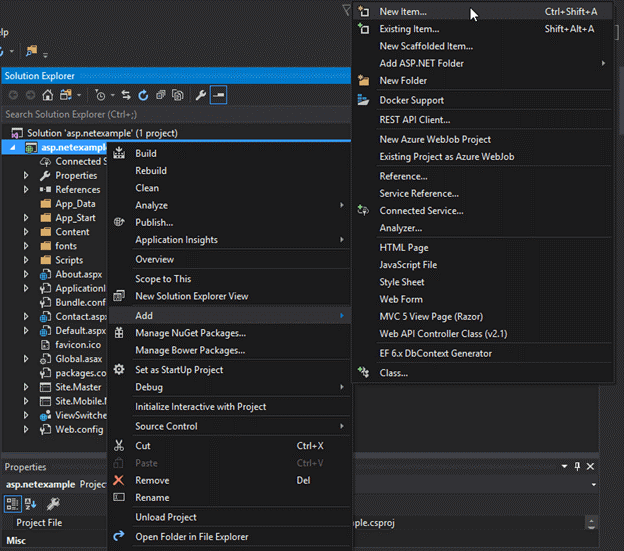
Open your existing project upon which the form will be added. Follow the steps below to carry out the process.
- Add a Web Form to the project.
This form contains some default HTML code.
- Add Controls to the form.
We may either drag components from the toolbox onto the form, or manually enter code to construct the controls.
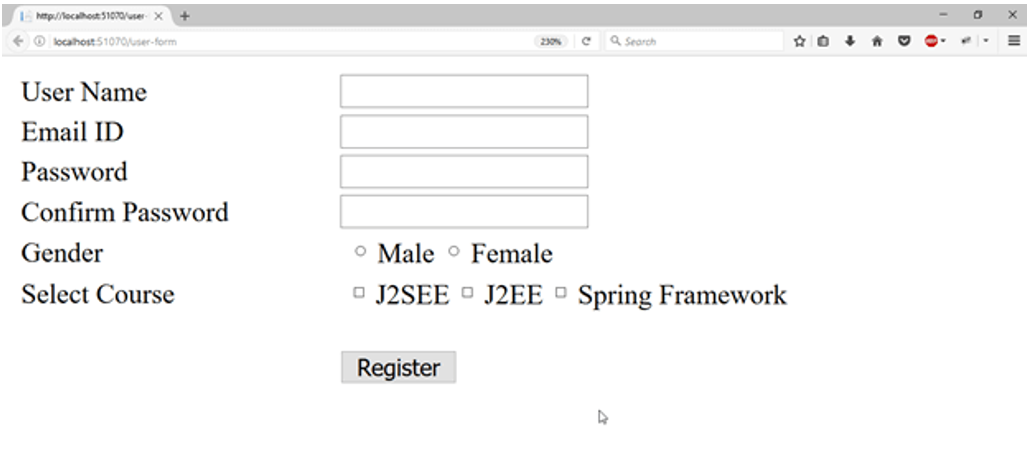
The code for a user registration form can be found in the following file.
<%@ Page Language="C#" AutoEventWireup="true" 2. CodeBehind="WebControls.aspx.cs"Inherits="WebFormsControlls.WebControls" %><!DOCTYPE html><html xmlns="http://www.w3.org/1999/xhtml"><head runat="server"><title></title><style type="text/css">.auto-style1 {width: 100%;}.auto-style2 {width: 278px;}.auto-style3 {width: 278px;height: 23px;}.auto-style4 {height: 23px;}</style></head><body><form id="form1" runat="server"><div><table class="auto-style1"><tr><td><asp:Label ID="Label1" runat="server" Text="User Name"></asp:Label></td><td><asp:TextBox ID="username" runat="server" required="true"></asp:TextBox></td></tr><tr><td><asp:Label ID="Label6" runat="server" Text="Email ID"></asp:Label></td><td><asp:TextBox ID="EmailID" runat="server" TextMode="Email"></asp:TextBox></td></tr><tr><td><asp:Label ID="Label2" runat="server" Text="Password"></asp:Label></td><td><asp:TextBox ID="TextBox2" runat="server" TextMode="Password"></asp:TextBox></td></tr><tr><td><asp:Label ID="Label3" runat="server" Text="Confirm Password"></asp:Label></td><td><asp:TextBox ID="TextBox3" runat="server" TextMode="Password"></asp:TextBox></td></tr><tr><td><asp:Label ID="Label4" runat="server" Text="Gender"></asp:Label></td><td><asp:RadioButton ID="RadioButton1" runat="server" GroupName="gender" Text="Male" /><asp:RadioButton ID="RadioButton2" runat="server" GroupName="gender" Text="Female" /></td></tr><tr><td><asp:Label ID="Label5" runat="server" Text="Select Course"></asp:Label>s</td><td><asp:CheckBox ID="CheckBox1" runat="server" Text="J2SEE" /><asp:CheckBox ID="CheckBox2" runat="server" Text="J2EE" /><asp:CheckBox ID="CheckBox3" runat="server" Text="Spring Framework" /></td></tr><tr><td></td><td><br /><asp:Button ID="Button1" runat="server" Text="Register" CssClass="btn btn-primary" OnClick="Button1_Click"/></td></tr></table><asp:Label ID="message" runat="server" Font-Size="Medium" ForeColor="Red"></asp:Label></div></form><table class="auto-style1"><tr><td class="auto-style2"><asp:Label ID="ShowUserNameLabel" runat="server" ></asp:Label></td><td><asp:Label ID="ShowUserName" runat="server" ></asp:Label></td></tr><tr><td class="auto-style2"><asp:Label ID="ShowEmailIDLabel" runat="server" ></asp:Label></td><td><asp:Label ID="ShowEmail" runat="server" ></asp:Label></td></tr><tr><td class="auto-style3"><asp:Label ID="ShowGenderLabel" runat="server" ></asp:Label></td><td class="auto-style4"><asp:Label ID="ShowGender" runat="server" ></asp:Label></td></tr><tr><td class="auto-style2"><asp:Label ID="ShowCourseLabel" runat="server" ></asp:Label></td><td><asp:Label ID="ShowCourses" runat="server" ></asp:Label></td></tr></table></body></html>
- Handle the Submit Request
We’ve added a message to the code behind the file that only appears after the user submits the registration form. The following code is included in this file.
using System;using System.Collections.Generic;using System.Linq;using System.Web;using System.Web.UI;using System.Web.UI.WebControls;namespace WebFormsControlls{public partial class WebControls : System.Web.UI.Page{protected System.Web.UI.HtmlControls.HtmlInputFile File1;protected System.Web.UI.HtmlControls.HtmlInputButton Submit1;protected void Page_Load(object sender, EventArgs e){}protected void Button1_Click(object sender, EventArgs e){message.Text = "Hello " + username.Text + " ! ";message.Text = message.Text + " <br/> You have successfuly Registered with the following details.";ShowUserName.Text = username.Text;ShowEmail.Text = EmailID.Text;if (RadioButton1.Checked){ShowGender.Text = RadioButton1.Text;}else ShowGender.Text = RadioButton2.Text;var courses = "";if (CheckBox1.Checked){courses = CheckBox1.Text + " ";}if (CheckBox2.Checked){courses += CheckBox2.Text + " ";}if (CheckBox3.Checked){courses += CheckBox3.Text;}ShowCourses.Text = courses;ShowUserNameLabel.Text = "User Name";ShowEmailIDLabel.Text = "Email ID";ShowGenderLabel.Text = "Gender";ShowCourseLabel.Text = "Courses";username.Text = "";EmailID.Text = "";RadioButton1.Checked = false;RadioButton2.Checked = false;CheckBox1.Checked = false;CheckBox2.Checked = false;CheckBox3.Checked = false;}}}
Now, we have the following result:
How to decide when to create a web forms application
You must carefully examine whether to use the ASP .NET Web Forms model or another model, such as the ASP .NET MVC framework, to create a Web application. The MVC framework does not replace the Web Forms model; for Web applications, you can use any framework. Consider the benefits of each strategy before you decide whether to use the web forms model or the MVC framework for a certain website.
Advantages of a web forms-based web application
The Web Forms-based framework offers the following advantages:
- It supports an event model that keeps state via HTTP, which is useful to develop line-of-business web applications.
- It makes use of the page controller design to provide specific pages more functionality.
- It makes use of view state or server-based forms, which can help with state management.
- In addition, small teams of web developers or designers can take advantage of a huge number of components accessible for speedy application development by using this platform.


