Table of Contents
5 things I wish I'd known about Git
Article was written by Ian Miell, author of the Educative course “Learn Git the Hard Way”.
Git can be utterly bewildering to someone who uses it casually or is not interested in things like directed acyclic graphs.
It’s difficult to get started, but you’ll find git has many useful tricks and layers that can bring your project to the next level. The best way to learn is with the help of an expert who started where you are now.
Today, I’ll briefly go through five things I wish someone had explained to me before I started using git.
Here’s what we’ll cover today:
Transition to Git in half the time
Master the top practical Git features to use in your day-to-day work
1. The Four Stages#
Having come from using CVS as a source control (an older example of a Version Control System (VCS)), one of the most baffling things about git was its different approach to the state of content.
CVS had two states of data:
- uncommitted
- committed
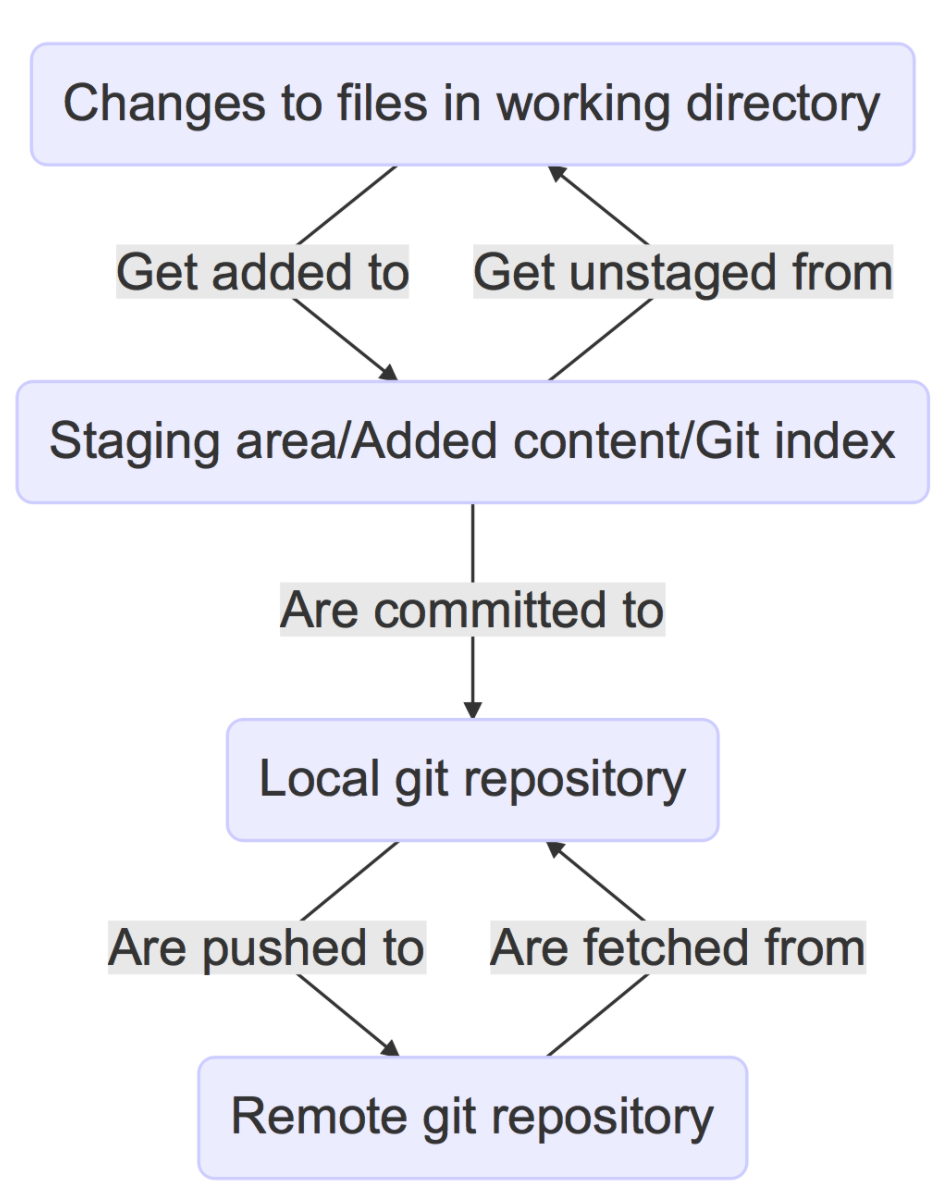
Whereas git has four states:
- Local changes
- Staged/added changes
- Committed
- Pushed to remote
If like me, you use git commit -am "checkin message" to commit your work, then the second “adding/staging” state is more or less invisible to you. Instead, the -a does it for you. It’s for this reason that I encourage new users to drop the -a flag and git add by hand, so that they understand these distinctions.
One subtlety is that the -a flag doesn’t add new files to the content tracked by git – it just adds changes made.
These states exist so that people can work independently and offline, syncing later. This was the driving force behind the development of git.
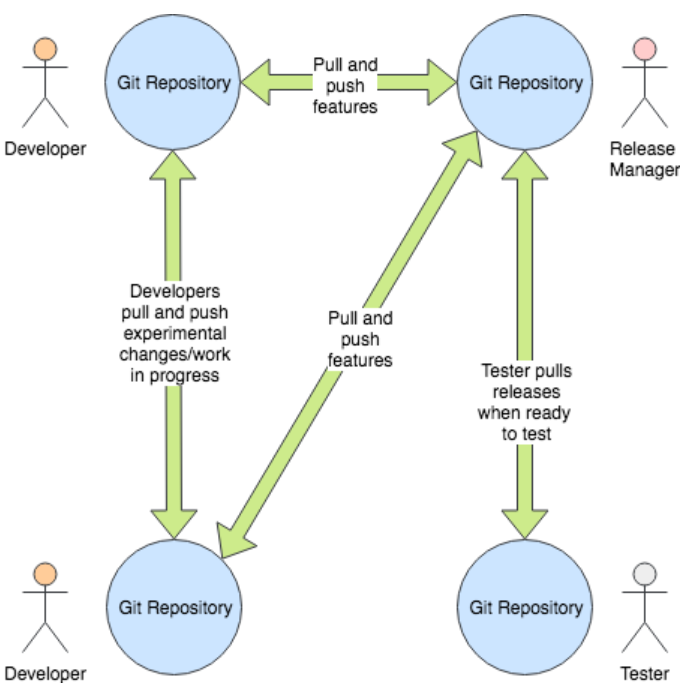
From this comes another key point: all git repositories are created equal.
My clone of your repository is not dependent on yours for its existence. Each repository stands on its own, and is only related to others if you configure it so. This is another key difference between git and more traditional (nay, obsolete) client/server models of content history management.
This results in a far more flexible but potentially more complicated workflow. The workflow now looks more like this:
2. What is a Reference?#
Git docs and blogs keep talking about references, but what is a reference?
A reference is just that: a pointer to a commit. And a commit is a unique reference to a new state of the content.
Once you understand this, a few other concepts make more sense.
HEAD is a reference to “where you are” in the content history. It’s the content you’re currently looking at in your git repo.
When you git commit, the HEAD moves to the new commit.
A git tag reference is one that can have arbitrary text, and does not move when a new commit is seen.
A git branch is a reference that moves with the HEAD whenever you commit a new change.
A couple of other confusing things then become clearer. For example, a detached HEAD is nothing to panic about despite its scary name – it just means that your HEAD is not pointed at a branch.
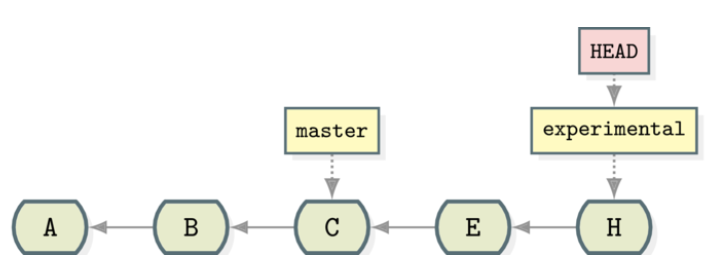
Take a look at this diagram:
It represents a series of commits.
Confusingly, with git diagrams, the arrows go backwards in time. A is the first commit, then B, and so on to the latest commit (H).
There are three references – master (which is pointed at C), experimental, which is pointed at H, and HEAD, which is also pointed at H. Remember, HEAD essentially means “where we are”.
3. What’s a Fast-Forward?#
Now that you understand what a HEAD reference is, understanding what a fast-forward is pretty simple.
Usually, when you merge two branches together, you get a new commit:
In the above diagram, I is a commit that represents the merging of H and G from its common ancestor (D). The changes made on both branches are applied together from D and the resulting state of the content after the commit is stored in a new state (I).
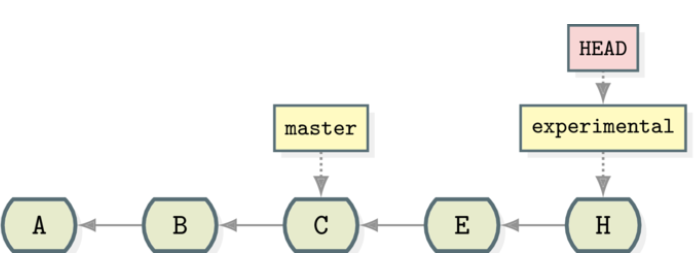
But consider the diagram we saw above:
There we have two branches, but no changes were made on one of them. Let’s say we want to merge the changes on experimental (E and H) into master – we’ve experimented, and the experiment was successful.
In this case, merging E and H into master requires no changes from H, since there are no F and G changes that need to be merged together with E and H. They are all in one line of changes.
Such a merge only requires that the master reference is picked up and moved from C to H. This is a “fast-forward” – the reference just needed moving along, and no content needed to be reconciled.
4) What’s a Rebase?#
My manual page for git rebase says:
“Reapply commits on top of another base tip.”
This is more understandable than previous versions of this main page, but will still confuse many people.
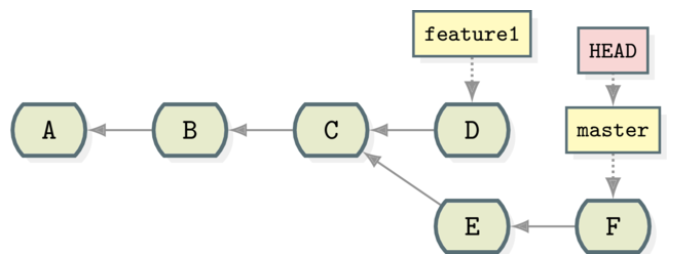
A visual example makes it much clearer.
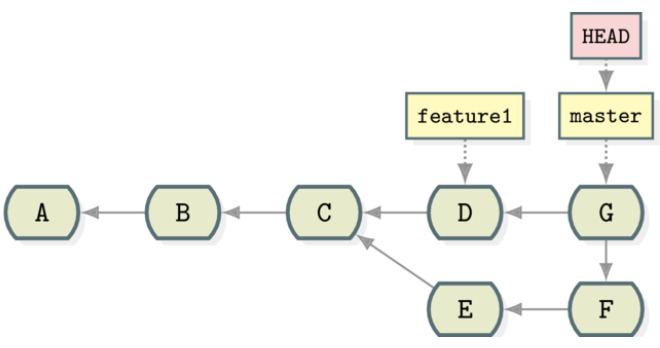
You could merge feature1 into the master branch, and you’d end up with a new commit (G), which makes the tree look like this:
You can see that you’ve retained the chronology, as both branches keep their history and order of commits.
A git rebase takes a different approach. It ‘picks up’ the changes on our branch (commit D on feature1 in this case) and applies it to the end of the branch we are on (HEAD is at master).
This looks a lot neater, doesn’t it? master can now be ‘fast-forwarded’ to where feature1 is by moving master‘s pointer along to D.
The downside is that we’ve lost something a slight organizational benefit by doing this. It no longer reflects the order things happened in chronologically. This is a trade-off you’ll have to consider on a case-by-case basis.
5) The power of git log#
The above concepts are all interesting, but how can you use these in your day-to-day work?
For this, I highly recommend getting to grips with git’s native log command. While there are many GUIs that can display history, they all have their own opinions on how things should be displayed, and moreover are not available everywhere. As a source of truth, git log is unimpeachable and transparent.
I wrote about this in more depth here, but to give yourself a flavor, try these two commands on a repo of your choice. They cover 90% of my git log usage day-to-day:
$ git log --oneline --graph

$ git log --oneline --graph --simplify-by-decoration --all
onelinedirects the log to only show the commit id and comment per-commitgraphprovides a visual of the structure right in your terminalsimplify-by-decorationtrims all minor changes from git history, allowing you to see all big developments across a project’s history
Branching made simpler with git switch and git restore#
When I first learned Git, git checkout was the Swiss Army knife for everything — switching branches, restoring files, even detaching HEAD. But it’s also one of the most confusing commands for beginners.
Thankfully, Git introduced git switch and git restore to make things clearer:
# Create and switch to a new branchgit switch -c feature/login# Switch to an existing branchgit switch main# Restore a file from the last commitgit restore src/index.js
These commands make your intentions explicit and reduce the risk of accidental mistakes. While checkout still works, I wish I’d known about these sooner — they make branch management far more intuitive.
Control your merge strategy with Git config#
The original article covers fast-forward merges, but here’s what I wish I’d known: you can enforce merge behavior so you never create unnecessary merge commits by accident.
# Always rebase instead of merge when pullinggit config --global pull.rebase true# Only allow fast-forward mergesgit config --global pull.ff only
These settings help keep your Git history clean and predictable, especially when collaborating with others.
Cleaning up large repos with sparse-checkout#
If you’ve ever worked on a massive monorepo and only needed a small part of it, Git has a solution: sparse-checkout. It lets you clone and work with only the directories you care about.
git clone https://github.com/example/huge-repo.gitcd huge-repogit sparse-checkout init --conegit sparse-checkout set src/utils src/components
This keeps your working directory lightweight and reduces clone time — a lifesaver for large projects.
Undoing mistakes the right way#
There’s more than one way to “undo” in Git, and each has its use case:
git restore – Undo changes in the working directory
git reset – Move HEAD and optionally discard commits
git revert – Create a new commit that undoes a previous one
git push --force-with-lease – Safely rewrite history on remote branches
Learning these early would have saved me countless headaches.
Supercharge your git log#
Finally, a small but powerful trick: enhance your git log with more context.
git log --oneline --graph --decorate --all
Adding --decorate shows branch and tag names, while --graph visualizes branching history. This one command gives you a complete view of your repository at a glance.
Next steps#
I hope these tips smooth your learning curve with Git and gave you one or more new tools for your next project. You’ll also need hands-on practice to make sure you’re ready to use Git professionally when the time comes.
To help you practice, I’ve adapted my book into an interactive Educative course, called Learn Git the Hard Way. This course starts off with fundamental concepts like repositories and commits and helps build your knowledge by exploring Git stash, pushing code, and more. By the end, you’ll have all the Git skills employers are looking for and a certificate to prove it.
Happy learning!

