Home/Blog/Web Development/Revamp your front-end skills: Hands-on with HTML5 and CSS3

Revamp your front-end skills: Hands-on with HTML5 and CSS3

16 min read
Oct 24, 2023

As more and more businesses pursue online markets, the demand for developers with web development knowledge is rising. However, it is difficult to go from beginner to interview-ready.

In this article, we’ll help you get there with hands-on practice on the major parts of a page’s design, HTML5, CSS3, and JavaScript. By the end, we will help you construct your first webpage!

To get the most out of this article, you should have some basic knowledge of web development.

To get up to speed on the basics, check out Beginner’s Guide to Web Development.

Today we’ll cover:


Master the web development trinity

Learn to build your own responsive and stylized web pages.

Web Development: Unraveling HTML, CSS, and JavaScript


Learn HTML: The Foundations#

The markup language HTML is the foundation of every webpage on the internet, responsible for displaying the raw content of a page and storing important markers used by search engines and web browsers.

In code, the distinction between these two is accomplished through tags, HTML’s most essential syntax.

Tags: The Essentials and Div#

There are dozens of tags in HTML, each acting as a keyword to mark the selected code to adopt present behaviors.

For today, we’ll cover the four essential HTML tags that must be present for a HTML document to be read by a browser, <html>, <head>, <title>, and <body>.

After that, we’ll cover an additional tag, div, which will be helpful for when we implement JavaScript later in the article.


HTML Tag

In HTML documents, these four essential tags must always be defined in the same order, with the first being <html>. This tag is our most simple, acting as a container element for the rest of the elements in the document.

Placed at the beginning and end of an HTML document, this tag allows the browser to clearly define where to look for HTML code.

While the first tag, this is not the first line in our document – all HTML documents must start with the a <!DOCTYPE>, informing what version of HTML to expect below. To mark a document as HTML5, our first line would be <!DOCTYPE html>.

Combining these two, the first two lines of each HTML document will always look like:

<!DOCTYPE html>
<html>

Head Tag

The second essential tag in our list, <head>, is a container element for information of a page such as its title and the keywords associated with it.

This information is not displayed as content on the page. Instead, it works behind the scenes to help search engines like Google determine the page’s relevance.

This is important to keep in mind for marketing and SEO purposes. This container is also where you can link the HTML document to other reference material to direct to our pull from, such as a CSS stylesheet as we’ll see later on.

In a HTML document, we’ll always find this container starting on line 3, meaning the top of each document will look like:

<!DOCTYPE html>
<html>
 <head>

Title Tag

Our third essential tag, <title>, specifies a name for the page to be presented to browsers and search engines.

This is contained within the previous <head> element, meaning that the title is not displayed on the page’s contents. However, you can find the title displayed on the tab bar when the page is open.

Here’s an example of how you’d add a title in a HTML document:

<!DOCTYPE html>
<html>
 <head>
   <title>aVeryGoodTitle</title>
 </head>

Body Tag

Our fourth and final essential tag is <body>, which marks the beginning and end of the page contents.

Any plain text images, links, etc. must be within the <body> element to be properly displayed. This container is where the majority of work on a HTML document takes place.

The body container is always found below the <head> container:

<!DOCTYPE html>
<html>
 <head>
   <title>aVeryGoodTitle</title>
 </head>
 <body>
   <!-- ...a very good webpage...-->
 </body>

Div Tag

Our final tag,the more specialized <div>, selects a specific group of elements within the code so it can be targeted by JavaScript commands.

This, and other selector tags like it, are essential when writing JavaScript code to work with HTML, since HTML is not object-oriented.

Elements in HTML doesn’t required identifiers when created, unlike variables in programming languages. As a result, referencing elements of HTML with JavaScript requires the developer to either assign an element specific ID and call those by name or to instead select a section of elements as the target via <div>.

We’ll see how this plays out later once we discuss JavaScript.

Basic Content Types#

Within the <body> element, page content can be further defined as either headers or paragraphs.

This dilation is useful as it allows you to set the visual attributes of all paragraphs or headers by just changing the behavior associated with that tag.

Let’s look a little deeper at both.


Headers

Header tags mark a line of text as a section header, making it appear visually distinct from other paragraph text.

By default, this simply increases the size of the text, but the style can be edited to include other visual differences as well, such as a different color, font, and more.

Beyond the visual, headers are also parsed by search engines for keywords as a factor for determining relevance to a given search.

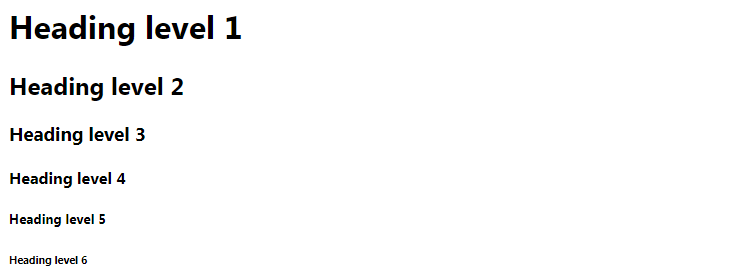
Headers can be set from levels one to six, with H1 being the largest, most important header and H6 being the smallest, most deeply nested subheader.

In the <body> section of our code, this would look like:

<h1>Header level 1 </h1>
<h2>Header level 2 </h2>
[…]
<h6>Header level 6 </h6>

With default settings, this is how above would appear client-side in a browser:


Paragraphs

Paragraphs are the simplest and most common form of content seen on webpages; any writing on a webpage that is not a header is represented in code as paragraphs.

Along with simple text, you can also include in-line images, graphs, animations etc., within this container. This can be seen in code as:

<p>This is a paragraph of text.</p>

Which would appear as:

Two important factors should be remembered when using paragraphs to ensure they appear as you intend:

  • Extra spaces or indentations within a single paragraph container will be cut from text when being displayed client-side
  • Line breaks are achieved by either creating another separate paragraph element or by placing <br> in line.

We’ll see this and the other HTML content we’ve learned so far in action as we begin our example document below!

Hands-on Web Dev: HTML Example#

A writer has hired us to create webpages for each of their stories; they’ve heard of how inventive web developers can be and want to use that to get some interest for their work.

The first one they’d like you to create is a page for their horror short story, The Call of Compiler.

To start, we’ll write a HTML document that displays the story title as header level 1 and the story itself as plain text with one sentence on each line.

For this, our program will look like:

<!DOCTYPE html>
<html>
<head>
<title>The Call of Compiler</title>
</head>
<body>
<h1>The Call of Compiler</h1>
<p>On a late dark night, under cold office light, a developer searches tirelessly for a bug in their code.</p>
<p>[many hours of coding later]</p>
<p>"Why does it not compile!", cried the developer, stuck in a loop of their own.</p>
<p>Fin</p>
</body>
</html>
Client-side view of the code above.

Note: Remember that you can use any browser, such as Linux, Chrome, Mozilla, Safari, etc. that you prefer. For more on browsers, check out our article on Web Dev for Beginners.


CSS: Adding Style#

While our example delivers all of the information, it doesn’t look very appealing as just plain text, nor would any website without additional stylings. This is where CSS comes in, allowing web designers to customize the appearance of elements to add some visual flair to our user interface

This can be done within the HTML file, however, this would require us to set the style of each type of element individually in any document using that style. We’d also need to replace the entire file each time we want to change a style attribute.

This is where external CSS stylesheets can help us out; we could instead create a single CSS stylesheet which includes all of our style information from which our HTML file can pull from. This is considered best practice in web design as it:

  • Unclutters HTML files by removing style related lines.
  • Allows multiple HTML files to draw from the same style, ensuring a uniform company wide style.
  • Edits can be made to the style of a page or pages without the replacement of each HTML file.

Keep the learning going.#

Master web development without scrubbing through videos or scattered articles. Educative’s text-based courses are easy to skim and feature live coding environments - making learning quick and efficient.

Web Development: Unraveling HTML, CSS, and JavaScript


Basic Style Attributes#

As we prepare to write our first CSS stylesheet, let’s go over three of the most common attributes used by web developers when managing the appearance of their text: font, color, and margin.

Font#

The font attribute is used to set the font of our text. Different fonts can be individually selected for each type in the document (p, h1, h4 etc.), or fonts can be specified for the whole document if you are modifying <body>. You can either enter the name of a specific font, like Ariel, or the general type of font, such as sans-serif, serif, or monospace. If using the latter option, the browser will select the default available font from that category – most likely Ariel, Times New Roman, and Courier, respectively.

Below is an example of setting the font of our body section:

body {
font-family: 'Georgia', 'Times New Roman', Times, serif;
}

It’s best to include multiple options and a category like the example above to ensure that your text can be viewed on any device regardless of available fonts on that device.


Color

Color is set with two different attributes: color, which sets the text’s color, and background-color, which sets the color of the text’s background. When altering color, you could either choose to set the color to one of the 140 preset colors supported by all browsers via writing the appropriate label (“red”, “aquamarine”, “darkolivegreen”, etc.) or by entering the hex color code (#FF69B4 for hot pink).

Below is how this would look within a CSS stylesheet:

    h1 {
      color: red;
    }

Margin

This attribute sets the positioning of the selected element on the screen. Margin is measured in pixels. Margin has four vectors it can be set on, margin-top, margin-bottom, margin-right and margin-left, which each control the amount of blank distance on that side of the element. For example, the value of margin-top is the number of pixels the element will appear from the top edge of the page.

Margin attributes can also be set in shorthand in a CSS stylesheet, either by entering as a single line:

margin: [top]px [right]px [bottom]px [left]px;

Or for easy centering of an element you can enter:

margin:auto;

However, this does not work with headers.

Linking a CSS Stylesheet and HTML Document#

All these attributes are set in a separate CSS stylesheet, but how do we get our HTML document to apply this style? To link the two, you need only add a single line!

In the <head> section, use the link command then specify the CSS document’s title as well as what the document should be used for.

In line, this would appear as:

<link href= "[filename].css" rel="stylesheet"/>

Here, href gives the HTML file the name of which CSS file to reference, and rel= "stylesheet" instructs it to use the CSS file as a stylesheet.

For more on CSS stylesheets and preprocessors, check out our article SASS for CSS.

Hands-on Web Dev: Stylizing our Example with CSS#

Of course, our client won’t just want their stories or homepage to be in plain text; they’d like something more interesting and engaging than that.

They want us to set up a CSS stylesheet with the following style guides:

  • The header text should be left-aligned, in serif font, with red text and a black background.

  • The paragraphs should be 20px left margin, in serif font, with white text and a black background.

Here’s how we’d set up our CSS stylesheet and HTML document to do that:

horrorStyle.css
callOfCompiler.html
body {
font-family: 'Georgia', 'Times New Roman', Times, serif;
background-color: black;
}
h1 {
color: red;
}
p {
color: white;
margin-left: 20px;
}
Client-side view of the code above.

JavaScript: Adding Interactivity#

For the final layer of our tutorial, see how JavaScript can bring our web pages to life!

While with HTML and CSS we can make a webpage colorful and informative, almost every modern site will require interactivity in some form, such as buttons, drop-down menus, and more. This is where JavaScript comes in, allowing us to make our site responsive to user events and to update information without needing to reload the site and edit the HTML code in real-time!

Common interactive features can be things as simple as a site responding to a click to more advanced forms like action prompts or real-time data representation.

In each of these examples, there is a certain situation, which triggers the reaction, called an event. JavaScript comes with dozens of common pre-built events that can be used to save time and make your work more interesting. These events can be linked to call functions, thus achieving interactivity.

Note: You can also use JavaScript frameworks and libraries to gain access to prewritten code for special functionalities.

Some common ones are AngularJS, NodeJS, and Django (written in Python).

To add JavaScript to an HTML file, we need to add the <script> container to our HTML file. This is where JavaScript can be written. As the two are so closely entwined now, you don’t even need to download anything additional! The <script> section is executed when the webpage is first loaded and will continue to check for the occurrence of an event, such as a click.

Note: Keep in mind that other programming languages, like PHP, Ruby on Rails, and Python, are also used for web development, especially for back-end and server-side software.

See our Web Development in Python article to learn more.

Hands-on Web Dev: Adding a Reactive Element#

To finish off our example, let’s add some JavaScript.

Our writer says just reading is too 20th century for their work; they want it to be interactive.

They’d like you to add a line between the second to last and last lines with red background and black text which says “Compile?”. When this line is hovered over, the text changes to “ERROR”. When the mouse leaves the line, it should go back to saying “Compile?”, as the developer character remains stuck on debugging.

For this, we’ll be using the built-in event prompts of onmouseover= and onmouseout= and designing two functions, mOver and mOut to respond to that event.

Here is how our HTML document would look with this functionality (our CSS stylesheet will stay the same.):

horrorStyle.css
callOfCompiler.html
<!DOCTYPE html>
<html>
<head>
<link href= "horrorStyle.css" rel= "stylesheet"/>
<title>The Call of Compiler</title>
</head>
<body>
<h1>The Call of Compiler</h1>
<p id= "myP">On a late dark night, under cold office light, a developer searches tirelessly for a bug in their code.</p>
<p>[many hours of coding later]</p>
<p>"Why does it not compile!", cried the developer, stuck in a loop of their own.</p>
<div onmouseover="mOver(this)" onmouseout="mOut(this)"
style="background-color:red">
Compile? </div>
<p>Fin</p>
<script>
function mOver(obj) {
obj.innerHTML = "ERROR"
}
function mOut(obj) {
obj.innerHTML = "Compile?"
}
</script>
</body>
</html>
Client-side view when the mouse cursor is not over the interactive element.
Client-side view when the mouse cursor is over the interactive element,

Here we see the div tag in action. We use it to specify that the element created within as the one that should react to the events.

Without this, the webpage would not know which element to change when the event occurs, leading to unpredictable behavior.

Diving into that div container, we see that the event onmouseover= calls the function mOver which edits the HTML code of the element within the div container, changing the displayed text to “ERROR”.

Similarly, when the onmouseoutevent is triggered, the mOut function is called to edit the same HTML line for our selected element, changing the displayed text back to “Compile?”.


DOM: How JavaScript Interfaces with HTML#

I wrote earlier that HTML isn’t object-oriented but JavaScript is, so you may be wondering how the two can interact so seamlessly.

This is because HTML and JavaScript interact through a medium format: a generated data structure called the Document Object Model (DOM), which translates HTML and CSS elements into node objects in a tree structure.

In doing so, the DOM makes these elements into an object-oriented form, allowing JavaScript to easily traverse and edit HTML and CSS code in the nodes, even while the page is active!


How can you view the DOM?#

Viewing and learning how to read the DOM can be helpful for understanding just how much HTML code goes into any given aspect of a webpage. Looking at the DOM, we can see how the basic tools you’ve learned today are still used by professionals in the field.

You can try this out on any webpage, even the page you’re reading this on!

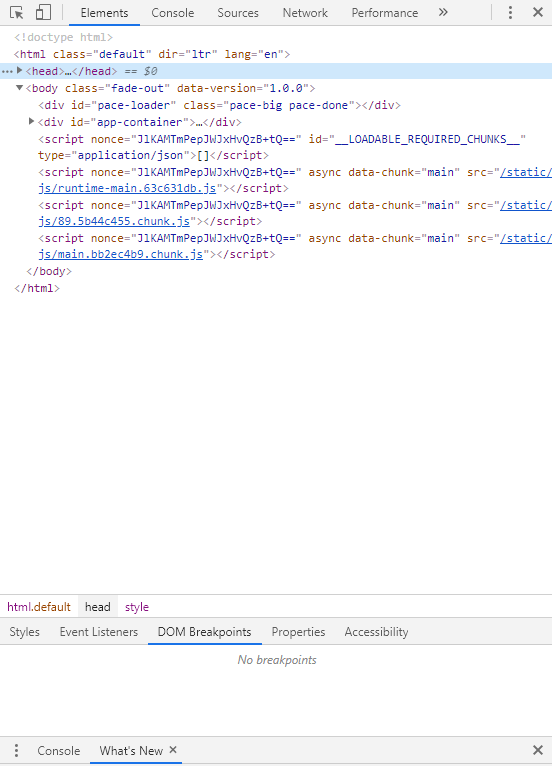
In your browser tools, open developer tools for any given web page. Then, select the “Elements” tab in the top of the window. This will show something very similar to HTML code but with minor changes that the browser has automatically made to convert it.

This is not surprising, as a page’s DOM is parsed from its HTML code.

As you hover over parts of the DOM code, the browser will highlight the part of the webpage it affects, allowing you to explore how certain elements were accomplished.

You can also inspect certain parts of the webpage and skip to that section of the DOM by clicking the button on the top left of your development tool and then clicking on an element on the webpage.

As you explore, try to find code fragments that you recognize: look for referenced CSS stylesheets, titles, or anything else you’ve picked up from this article!

Don’t worry if you don’t understand most of it, remember that the team that wrote the page you’re viewing started off right where you are now!


Conclusion#

Just like that, you’ve made your first HTML document! While it may seem like a long road now, you should congratulate yourself on taking the first steps toward a bright and creative future in website development.

If you’re looking for a next step on your journey and want to learn more about web development’s finer complexities, see our course Unraveling HTML, CSS, and JavaScript! You’ll get a detailed dive into all the new web dev tricks you need to be a modern, efficient programmer.

Happy learning!

Frequently Asked Questions

How can I improve my front-end skills?

To improve your front-end skills, try the following:

  • Practice by building projects regularly.
  • Start learning by taking online courses and earning certifications.
  • Stay updated with the latest front-end frameworks and tools.
  • Learn responsive design and modern CSS techniques.
  • Enhance JavaScript proficiency, including ES6+ features.

 
Join 2.5 million developers at
Explore the catalog

Free Resources